

Gearbox's
The cars > Developments and changes
The winter Project 2016/7
Transmision changes
This year the winter modifications are more about comfort and confidence, however what started as a simple list of "upgrades" and changes turned out to be a considerable amount of work leaving very little unchanged in terms of the interior space transmission and exhaust system.
The List of planned jobs was simple;
- Convert the transmission from automatic to manual R380 5speed.
- Fit new Rakeway Land Rover LT 230 Upgrade / High ratio one piece shaft Transfer box.
- Rework the interior of the Car, Floors and Transmission tunnel.
- Rewire the entire car.
Firstly, Why?
-
Change the transmission to Manual; Basically the Rover V8 is not the most powerful of engines available any more and exiting corners was always a bit of a challenge, having to apply the power early to be accelerate out of corners and hopefully in general provide some improved car control, engine braking etc.
-
New Rakeway Transfer box; Early last season and a few times over the years we have had issues with the transfer box "dropping out" and we never used the Low box! The Rakeway option also reduces weight and size so the way the new Transfer box fits we will be able to gain some more floor space. "Hopefully?"
-
Reworking the interior; The changes to the transmission and some plans to move the engine (again) meant this is an eventual change, also it's the only way to get the new seats in!
-
Rewire; Just a good opportunity, with everything else stripped out.
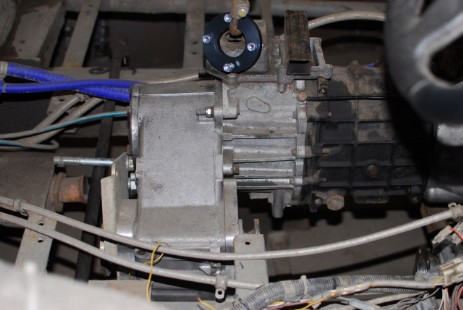
The first part of this project was to get the old transfer box out of the car and deliver it to Rakeway.
My plan was to drop the transfer box (and a donor box) into Rakeway on the way up to Scotland as we where assisting with the set up and marshaling of the Scottish round of the Hill Rally.
Yes the team marshal at Cross Country events as well as compete.
Even this was not without its challenges .
As the car needed to be in the Squirrel pit and the whole crew had plans to be heading to Scotland it left only one brief opportunity to get the car in place and the transfer box out, There was less than two weeks between the last round of the BCCC at Walters and the Scottish hill rally, however we managed it and the tranfer box is dropped off (actualy two as I left them with a donnor in case there where any issues withthe box to be built up)!
OK having delivered the transfer box I had to find an opportunity to collect it (it about 150 miles between me and Rakeway) also I had already sourced a R380 short stick gearbox, however it was an unknown entity, so when the guys at the Old forge Garage in Lincoln offered me a recently reconditioned Gear box I jumped at the opportunity. This lead to planning the "Grand tour" just before Christmas to travel to Staffordshire for the new transfer box (and a Center prop bearing) and then across to Lincolnshire for a gearbox before stopping of at the Squirrel pit and finally home to the Engine shed a total journey of just short of 500 miles.
So now I have all the parts...........
With the car already in the squirrel pit the first major job for this years "Project", Strip the entire interior of the car, Removing;
- The seats
- The interior floors,
- The transmission tunnel,
- The front bulkhead panel
- The rear (top) bulkhead panel
- The exhaust system
- The old auto box (transfer box already out)
- All the wiring, dash etc.
So converting from automatic to manual, just bolt the new gear box in right?
No.........
First you need to remove all the drive plates and crankshaft
adaptors from the engine. Then install the input shaft support bush
and fit a new fly wheel (different bolts to the Auto). In our case
we struck a bit of luck here as we where able to source a lightened
flywheel in good condition, the only issue with this is that it does
not use the standard 9" V8 clutch plate and cover. After some
consultation with my local Land Rover parts supplier we identified
that the 7 1/2" TDI clutch bolts strait on! It should cope with the
Torque as well. using all the standard Clutch forks and slave
cylinders etc.
Not forgetting we already fitted the correct bulhead pedlel box to spport the cluch master and pedel.
Now the gear box bolts straight in.......
Not yet....
At this point we find that the rear gearbox mounting brackets are
different to the Auto and to make things even more difficult for
myself I constructed new engine mounts to provide captive engine
mounts and to move the engine further back in the car (the Prop
shafts where going to have to be specials anyway).
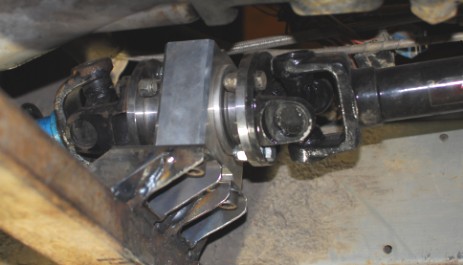
The Gearbox bracket on the transfer box also needs to to be totally redesigned anyway, as part of the Rakeway modification removes the part of the casing where the original fits.
The Gearbox bracket on the transfer box also needs to to be totally redesigned anyway, as part of the Rakeway modification removes the part of the casing where the original fits.
Oh and by the way if you
are fitting a Rakeway transfer box and a Disk parking brake you will
need a little locating ring to fit into the Disk as the output
flange from the Transfer box has a female locating ring the same as
the Prop flange, Have a look at a standard drive flange and you will
see what I mean.
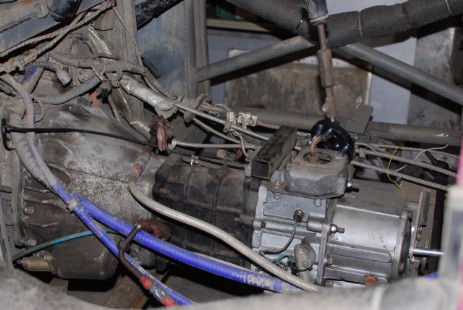
Bolt the new transfer box in place. This goes straight in with no drama at all, and its lighter so easier to manipulate into place.
Bolt the new transfer box in place. This goes straight in with no drama at all, and its lighter so easier to manipulate into place.
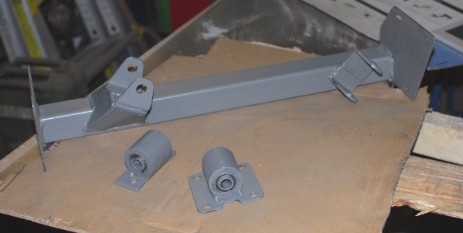
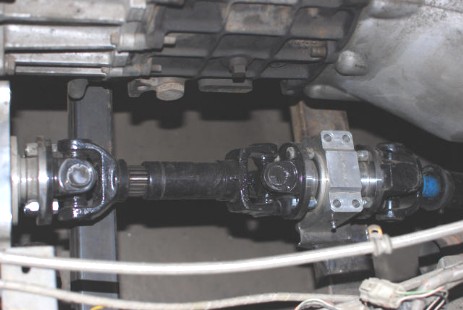
Now the first real engineering challenge we have to make up the
gearbox mountings, I had been looking at the various options for
some time and had already decided that this would be in the form of
a new cross member with the mount points integral to this and using
the original bolt holes from the previous Std LR Gearbox
mounting brackets in the chassis.
See the pictures for the results,
See the pictures for the results,
I am rather proud of this. Athogh it did need a small modification at the end of the season.
Next was to create a mounting bracket for the Front prop shaft center bearing. This has to be very strong as the forces being placed on it will be significant.
This time the first design worked and the new brackets are welded on to the original front cross member. This both allows for the standard front prop shaft to be used and reduces some of the prop angles involved, Lower location within the chassis.
April 2019, update;
During the first event of the year, after having fitted the upgraded & more powerful engine the center bearing mountings failed
The result of getting it wrong and not making the bracket strong enough.
OK this may not be a direct result of the new engine but it probably was the final straw.
The "challenges" continue, the next turned out to be the handbrake assembly. You will find some details else ware on the site how I fitted this originally and if you have already read that part may recall that I rotated the mounting plate. Guess what, having done this it does not bolt strait onto the new transfer box. The tail/output shaft is shorter and the orientation of the caliper interferes with the back of the transfer box. The solution was to add a 15mm spacer between the output drive flange and the disk, adjusting all the spacers to make it fit.
Now and ONLY NOW!
we measure up and order the new Bespoke Prop shafts. Do not underestimate the cost of these components they are not cheap! these are fitted almost as soon as they are supplied.
The long prop is the new bespoke wide angle long travel rear prop.
The small prop is the link between the shortened transfer box to a Center bearing and finally a "standard" wide angle front prop.
The small prop is the link between the shortened transfer box to a Center bearing and finally a "standard" wide angle front prop.
The Next job on the list involves the CAD! That's Cardboard Aided Design. to construct a new interior space. I had several objectives with doing this;
- Create the correct space and mounting points for the seats.
- Increase the airflow over the back of the engine by "raising" the height of the transmission tunnel toward the front.
- Improve some of the cable and pipe routing in to the rear "tray".
The seat mounting brackets and frames needed adjusting, relocating and in one case replacing. to provide the correct and secure mount points for the new seats. There is no point in have nice new seats if they are not fitted properly and securely, so considerable time is spent getting these "just so".
Once the seat mounts are in pace we started making up the floor panels and on the drivers side a seat box as this sea is raised to clear the transfer box and handbrake.
Then a new front bulkhead, if you can call it that as there is not much of it left, about 50mm around the new planned tunnel. Now the tunnel sides. I made the side up in four sections, this was to make the fitting and developing the correct shapes simpler. finally the top face, again this was developed in two pieces. One advantage of putting the top on in two sections is that the hole for the gear stick is easier to locate and cut and it meant I could fix the new "partially prepared dash panel" on the new front section first.
Then a new front bulkhead, if you can call it that as there is not much of it left, about 50mm around the new planned tunnel. Now the tunnel sides. I made the side up in four sections, this was to make the fitting and developing the correct shapes simpler. finally the top face, again this was developed in two pieces. One advantage of putting the top on in two sections is that the hole for the gear stick is easier to locate and cut and it meant I could fix the new "partially prepared dash panel" on the new front section first.
We now have to reconstruct the exhaust system as the new cross member, Prop shaft locations, Seat mounting points etc. have made the original totally impractical.
First attempt I purchased a significant amount of 2" tube and bends based on the original exhaust being made up of this size pipe, only to find that this was not going to work after the first bend in the system.
First attempt I purchased a significant amount of 2" tube and bends based on the original exhaust being made up of this size pipe, only to find that this was not going to work after the first bend in the system.
Much head scratching and contemplation took place before I decided on a whole new design using 2 1/2" Pipe after a new "Y" piece from the front pipes.
I lost count of how many times the various bits of pipe where set up tacked removed adjusted re-tacked and finally welded, each time having to take out the new gearbox cross member, as the only route is very tight and ment it wold not just feed throgh the gaps.
Fainaly I am happy withe layout and routing etc. It was a full two weekends work (averaging 12 Hr. days)!
The slightly strange route that the tail pipe follows to be able to clear the rear axel diff case and the "A" frame ball joint,
as well as the new rear silencer and mountings.
The complex route of the front pipes, Where the "Y" piece passes over the Cross member there is about 5mm clearance all round
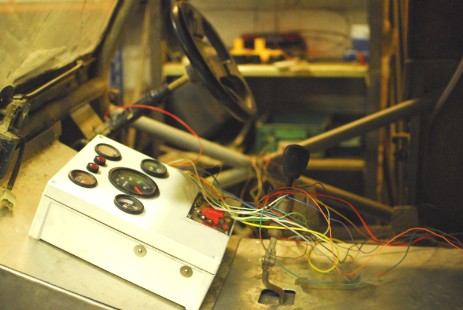
Now rewire the car including the new "dash panel" relocated and repurposed fuse boxes and relays.
Even for a relatively simple car like this it was another two and half weekends work!

Whilst all the above was going on, I called in the reinforcements to help with lots and lots of the little bits and pieces that I just did not have time to do myself,
Thank you to every one that "mucked in" we would not have made the first event without this help.
By now its the last week end before the first race of the year, we start the engine for the first time since the car was moved to the squirrel pit!!!!!!
Ready to race.